from RE-CYCLE to UP-SCALE Useful Garden Art

metal barrier 1
metal barrier as I brought it home

A few weeks ago I stopped at a garage sale and picked up this metal barrier.  I was told that it was used as a barrier around a public sign at a park.  At the time I wasn’t sure how I would use it or what I would do with it, but I knew it would go in the garden.

metal barrier 2
assorted tiles

I gathered up some tiles, also picked up at a garage sale for under $2.00 and glued the tiles on the metal barrier with a very strong construction glue.

metal barrier 4
barrier decorated

All done…   I decided to use it to keep the ‘red dragon’ persicaria from falling over.  I have used tomato cages to keep it from falling over before, but I like this better.  The red dragon needs to grow into it a bit, but overall a successful garage sale find up cycled into useful garden art for a song.

metal barrier done & in place

ART IN THE CHICKEN COOP

ART IN THE CHICKEN COOP

Why not art in the chicken coop. It can be an important part of your landscape. Why not make it attractive by adding some artistic touches. Stained glass window – reused, recycled, up-cycled… from garage sale to the chicken coop! We’ve used this with other blue accents in this part of the garden.

This is the south side of the chicken coop (fortress) to see more check out ourhomeinthewoods@wordpress.com http://wp.me/p2kNeQ-by

Bird Cage as Garden Art adds Interest & Protects Plants

Here’s a great idea to keep the bunnies, deer & elk from dining on your favorite plants.20120516-114523.jpg

Find an old birdcage, of any kind,  the more interesting the better.

  • Paint it if you want.  ( a can or two of a good quality of spray paint )
  • Take the bottom out, then place it over your plants!

This cage is an interesting and attractive way of protecting a compass plant ( Silphium laciniatum ).  Last year we never saw a full leaf.  It’s two years old and has 3 leaves now that it’s no longer fine dining for the bunnies.

Garden Art – Molded Concrete Stepping Stone

This was an experiment in molded concrete stepping stone, that turned out well!

20120514-164321.jpg

I’ve done lots of other concrete stepping stones but this is the first time putting it into this kind of mold.  I don’t know what the mold was originally designed for. I found two of them at a garage sale for $ .50.

Disclaimer: I’m no expert,  I do a lot of experimenting and this one turned out well.  Your results may not be the same.

What you need:

  1.  Portland cement (concrete work is messy, do it outside, be careful when  mixing the concrete not to breath the dust.)
  2.  Sand
  3. Water
  4. spray cooking oil
  5. Some sort of mold ( plastic bin, jello mold, use your imagination )

Technique:
I mixed the cement with sand at about the rate of 2 parts concrete to 1 part sand, I think 1 part concrete to 1 part sand is recommended. Mine may not be as strong.

I sprayed the plastic mold lightly with cooking oil.

I gently pressed the concrete ( mixed to the consistency of brownies ) into the mix.

Let it dry in a cool damp place for a few days. Then gently un-mold and let it continue to cure for about a week before setting it out.

Garden Art from bowling balls

I love an opportunity to make something ‘throw away’ into something that can be not only usable but interesting and attractive.  (I found these at garage sales for $3.00 – $5.00)

The rich color of this red bowling ball adds color and interest in the garden, quietly tucked into the corner.

If you want to make a bowling ball more interesting, here is another idea.

This is a bowling ball mosaic done with tiles that I made (with the help of a very talented friend)  We used them for an great tile project in our entry and had lots left over and used some here.  They were glued on, allowed to dry, and grouted.  I never got around to sealing it.  It has been through one very wet, cold, snowy winter so far and is in perfect condition.

I saw some black bowling balls painted like ladybugs.  I might try that with one of the 3 bowling balls in the garage.

More to come……

A Well Planned Kitchen Garden… what to consider

Thinking about a kitchen garden…

What is a ‘kitchen garden’?   That seems to be the buzz word for what we used to call the vegetable garden.   It’s a bit more inclusive, I guess, I’m calling our garden a ‘kitchen garden’ because it’s more than a vegetable garden.  We are including fruit trees, grapes, assorted berries and herbs as well as a good supply of vegetables and greens, hopefully year round.

What goes into a good kitchen garden?  GOOD PLANNING.  These were the things that influenced how we placed and planned our garden.

A well planned garden will be a pleasure for years and good planning can reduce the work and increase the beauty, productivity and value you get from your kitchen garden.

  • The kitchen garden is prime real estate!  Location, location, location!  It needs to be convenient to the house.
  • It needs to be located in the sunniest spot you have.
  • It needs to be convenient to resources, water, power, if you want lighting or heat mats in cold frames, not too far from your compost bin.
  • If critters are a problem in your area, you need to be able to defend your garden.  Do you need wire fence, electric fence, bird netting?  Fencing can be expensive, make your space count and lay your garden out efficiently.

  • Be realistic about what and how much you want to grow.  More than half of our garden is perennials,  bushes and trees.  All they need is some fresh compost every year and some pruning.
  • If you are in an area with a short growing season, like we have, you might want to consider planning for cold frames or cloches to extend your growing season.  (more about that later)
  • Pick your plants realistically.  I would love to grow lots of stone fruits, melons, and figs, but they won’t thrive here and space is too valuable to waste with plants that won’t do well.
  • Make it easy care!  If the garden work isn’t therapy to you and it just represents work, you won’t enjoy it.  Raised beds will warm a bit earlier and make a garden look neat and organized. We chose concrete because wood will break down and the chemicals in treated wood aren’t a good choice for food gardens.
  • Make it beautiful, just because it is a food garden doesn’t mean it has to be boring or ordinary.   A piece of art or a touch of whimsy can add so much to a garden.

Just like any beautiful place, you will be drawn to it.   I’m planning a space for a chair (with a pretty pillow) so I will have a nice place to have a cup a tea and listen to the birds and ponder.

More to come…..

Vegetable Gardening Again

Last summer we started planning and building a ‘real’ fruit and vegetable garden for the first time since we moved to this property in 2000.   We have some ‘issues’ related to growing food (or anything) where we live.  We are positioned at the bottom of the west side of a mountain.  In the summer the sun comes up about 11:00 am, so it’s cooler and darker, and our gardens are several weeks behind the rest of the Snoqualmie valley.  Lots of rain, frequent high winds and critters also pose some challenges! Between the slugs, snails, rabbits, the deer, the herd of elk and the bears, a good strong fence is necessary and as the trees start bearing fruit we will be adding electric fence.  Bears have been known to be unsatisfied by just picking a few apples and heading back to the woods.  They pull out the whole tree and make off with it.

The heat pump, a tree (removed now) and crappy dirt.

(above) Fenced in, ready to build the chicken ‘compound’ and future kitchen garden from the back of the house.

(above) Fenced in, ready to build the chicken ‘compound’ and future kitchen garden from the front of the house.

My husband (the over-builder) doesn’t build an ordinary wood raised bed garden.  He wants to build it ‘right’, be done with it and move on to the next project.   The spot in our yard with the best sun, is a low spot and has some drainage problems, it’s been pretty muddy.  Solution:  concrete raised beds, bringing in soil and rock paths.  So he has been framing up each section, mixing the concrete in the wheel barrow and filling it with soil.   I have been setting decorative tiles and other bits into every bed, making it into a giant ‘art project’.  We want this garden will be easy care,  functional, and efficient as well as beautiful, interesting, artistic and fun.

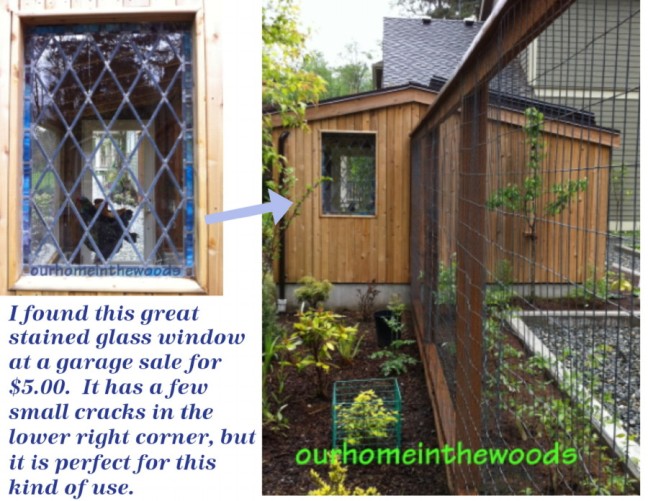
( The building is the chicken ‘compound’.  This ‘coop’ is a story for another day. ;-). )

The concrete may create some problems this year as it cures.  It is very alkaline, so we will try to keep organic matter into the soil to keep it neutral to slightly acidic.

We are really pleased with how it is turning out so far.  We still need to frame up and pour two smaller sections and install an art piece that we bought when a local nursery went out of business.  Then there is more soil to bring in, more rocks to move in then finally, planting the summer plants that we started from seeds in the house.  In the fall there will be a cold frame to extend the growing season.

More to come……